Sampling Liquid Manure for Analysis
By Trevor Wallace – Nutrient Management Specialist, Agriculture Stewardship Division, Alberta Agriculture and Food. Livestock manure is an excellent source of nutrients for annual and perennial crop production. 8 February 2008
 14 minute read

It is critical to know the nutrient content of the manure to determine an appropriate manure application rate that meets crop requirements, maximizes yield and minimizes environmental impact.
This factsheet will discuss the importance and value of sampling manure as well as the best practices for sampling.
Why Should Manure be Analysed?
The nutrient content of manure may be obtained through manure sampling and analysis or from “book values.” Manure nutrient composition varies widely among farms due to several factors:
- differences in animal species
- diet and feeding practices
- bedding practices
- type of manure (liquid or solid)
- management of storage
- environment
Book values may be a good place to start when calculating initial manure application rates, but they may not reflect the real nutrient content of the manure from a particular farm. The best way to get a farm-specific estimate of manure nutrient composition is through proper sampling and analysis.
Why Should Manure be Sampled?
Proper sampling is the most important factor affecting the accuracy of manure analysis. Since a very small amount of material is sent to a laboratory for analysis, it is essential that the sample collected be representative of the average composition of the manure being applied.
The nutrient composition of manure can change with time, so manure should be sampled as close to the time of application as possible. This is especially true for uncovered lagoons and pits since seasonal variations in temperature and precipitation can alter nutrient content through dilution, evaporation and volatilization. The nutrient content of manure stored in under-barn concrete pits or covered above-ground tanks will not vary as much since there is limited exposure to environmental influences. An elapsed time of a few weeks between sampling and application is likely not critical.
The nutrient composition of liquid manure will vary spatially in a storage structure due to solids settling over time. Settling results in the stratification of nutrients and material in the lagoon (Figure 1). If this spatial variability is not addressed, test results will not reflect the nutrient content of the manure applied.
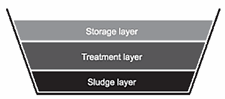 |
| Figure 1. Stratification of nutrients in a liquid manurestorage structure |
Spatial variability can be addressed through proper sampling techniques and procedures. Ideally, because of nutrient stratification, liquid manure should be thoroughly mixed for two to four hours before collecting a composite sample. Agitation of the storage mixes the different layers and re-suspends the nutrient-rich sludge layer. If the liquid manure is well mixed, a single composite sample may be collected and will reflect the average nutrient content of the manure in the storage.
If mixing is not performed, a sample should be collected from each depth of the storage profile to build a composite sample that reflects differences in nutrient content. Alternatively, several (three or more) composite samples may be collected for analysis representing the various depths of the liquid manure storage (top, middle and bottom). Collecting representative, good quality samples from an un-agitated manure storage facility is very difficult and is not recommended.
Knowing the advantages and disadvantages of collecting liquid manure samples either before or during application can assist in identifying appropriate sampling strategies for an operation.

Sampling Strategy in Relation to Planning Application
There is one thing to note when collecting manure during application. Manure test results will not be available to calculate application rates for that application. The analysis, however, can be used to determine whether adequate amounts of nutrients were applied and to determine supplemental manure or fertilizer needs and application rates. You can use a manure analysis from the previous year to calculate the current manure application rate and the current analysis to estimate the next application rate.
Three to five years of manure analysis should provide your operation with baseline manure nutrient content values, which can be used to calculate manure application rates. The more reliable the estimate of manure nutrient content, the more reliable the calculation of manure application rates.
Manure should be re-sampled and analyzed if you change any component of the animal management, manure storage or handling system. As long as significant changes in the livestock production system have not been made, the nutrient content of the manure within an operation should remain fairly consistent.
Sampling Liquid Manure
It is best to consult with the manure testing lab before sampling to identify lab-specific requirements for sample size, packaging and shipping, turn-around times, analytical options and costs. Some labs provide containers, labels and submission forms, and they may cover the shipping costs depending on the number of samples submitted.
Tip: Use only plastic buckets for the collection and mixing of manure samples because galvanized steel containers can interfere with analysis results. Do not use glass containers for either sampling or shipping due to the risk of breakage and subsequent injury.
Hazards associated with liquid manure storage facilities
Liquid manure storage facilities present several hazards to personal safety. Gases such as hydrogen sulphide (H2S) and ammonia (NH3) can cause symptoms ranging from headaches and eye irritation to death depending on the length of exposure and gas concentration. Never enter an enclosed area that contains manure without wearing proper respiratory equipment.
Sampling During Application
The most convenient time to sample manure is when it is being pumped from the storage for application (Figure 2). More importantly, a more accurate sample can be collected after the manure has been agitated and is being pumped from the structure. Sub-samples may be collected from the entire facility as it is being emptied.
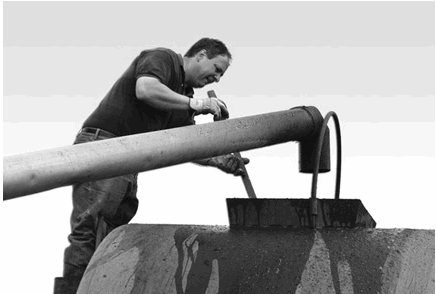 |
| Figure 2. Sample manure when pumping from storage. Photo courtesy of Ontario Ministry of Agriculture, Food and Rural Affairs |
Samples should be collected that represent the top, middle and bottom of the manure storage as it is being emptied. Avoid sampling at the beginning and end of pumping since these samples are less reflective of the manure in storage. A good rule of thumb is to collect and analyze one composite sample for approximately every 1,000,000 L (300,000 gal) pumped.
If using a drag hose system, samples may be collected directly from the injectors as they are lifted from the ground. Alternatively, buckets or catch pans randomly placed in the field can be used to catch manure from broadcast or irrigation applicators. Although messy, these methods of collection provide a real estimate of the nitrogen applied after handling and application volatilization losses have occurred.
Samples should be collected throughout the application process. For large storage facilities, manure application can take several days. In these situations, separate composite samples can be developed for each stage of the process or even for each day. When samples are taken over a span of several days, interim storage and handling of samples becomes important. Be sure to protect the sampled material from the elements to minimize moisture and nutrient (i.e., nitrogen) changes.
Equipment needed for collection:
- a 20-L (5 gal) plastic pail
- a small collection can or a pole-and-cup device(Figure 3), a bucket or a pan
- a clean one-litre plastic bottle with a screw-on lid
- two or more large plastic re-sealable freezer bags
Sampling Liquid Manure During Application
Step 1 - Using a sample collection device (Figure 3) to collect several grab-samples:
- from the manure pump outlet as the storage facility is being emptied
- from each or every other tanker load
- with a drag hose system, samples may be collected from the injectors as they are lifted from the ground or from the tap near the pump
- with buckets or catch pans randomly placed in the field to catch manure from broadcast or irrigation applicators
Step 3 - Repeat Steps 1 through 2 until the following has occurred:
- the manure storage facility has been emptied
- about 1,000,000 L (300,000 gal) pumped
- the designated amount of manure has been applied
Step 5 - Label the plastic bottle (date, time, farm name, manure type, contact information) and seal in two plastic bags in case of leakage. Keep the sub-samples cool and transport immediately to the lab for processing. If the samples cannot be transported on the day of collection, freeze them until transportation is possible to stop nutrient conversion reactions and the build-up of gases.
Step 6 - If collecting and analyzing several composite samples, keep track of where the manure for each composite sample is applied. This procedure may allow for more site-specific nutrient management planning as each field or group of fields may be represented by a different composite sample.
Sampling from Storage
Sampling from a liquid manure storage area is not as accurate as sampling during application, and it can be dangerous. Exercise caution.Growers with multi-stage systems should draw the sample from only the storage containing the manure that is to be applied. It is difficult to obtain a representative manure sample unless the storage has been adequately agitated or partially drained.
Equipment needed for collection:
- a 20-L (5 gallon) plastic pail
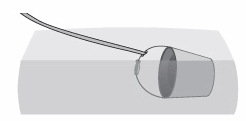
- a manure-sampling device (Figure 3):
- composite sampling probe: a 2.5 to 3.0 m (8 to 10 ft) length of 1.3 to 5.1 cm (1/2 to 2 inches) in diameter PVC pipe can be used with either a rope and ball to plug the bottom end or the hand used to plug the top end
- pole-and-cup device: a pole 3 to 4.5 m (10 to 15 ft) long with a cup attached to the end (Figure 3)
- bucket and rope (Figure 3)
- composite sampling probe: a 2.5 to 3.0 m (8 to 10 ft) length of 1.3 to 5.1 cm (1/2 to 2 inches) in diameter PVC pipe can be used with either a rope and ball to plug the bottom end or the hand used to plug the top end
- a clean one-litre plastic bottle with a screw on lid
- two or more large plastic re-sealable freezer bags
Caution – Agitation causes the release of H2S gases. Respiratory equipment is recommended when working around the storage during or right after agitation.
To collect a sample using a composite sampling probe (Figure 3), start by brushing away floating debris or scum from the collection area to avoid collecting it in the sub-sample. Extend the pipe into the storage about 2 metres(6 feet) away from the edge of the storage. Be careful not to plug the end of the pipe with sludge from the bottom of the lagoon. Once the tube reaches the bottom of the storage, the tube is sealed off using either a bull plug on the bottom (attached to a handle at the top) or by covering the top of the pipe with your hand (to create an air lock).
The pipe is withdrawn from the storage. The airlock is released, and the manure is poured into the collection pail. Move around the storage and collect 8 to 12 samples from various locations around the perimeter of the storage using this method, creating a composite manure sample for the storage.
Alternatively, a pole with a cup (Figure 3) may be used to dip into the storage and take samples from 8 to 12 different locations near the top, middle and bottom of the structure. Collect each sample about 2 metres (6 feet) from the edge of the storage. Avoid floating debris or scum when collecting the sample. In an unagitated lagoon, this method is less accurate than the column method. Samples may be collected either in one composite pail or in a pail for each sampling depth.
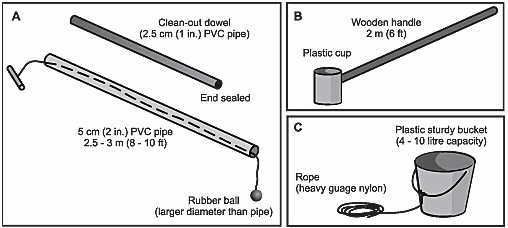 |
| Figure 3. Liquid manure sampling devices: (a) composite (b) pole-and-cup (c) bucket and rope |
A small bucket tied to a long rope can be used to obtain a sample from the manure storage (Figure 4). Even in an agitated storage facility, this method is the least accurate.
 |
| Figure 4. Bucket and toss method |
To collect the sample, throw the bucket out to the middle of the storage while holding on to the rope. Begin pulling the bucket back as soon as it breaks the surface of the liquid, pulling it through the top 30 cm (12 inches). Avoid floating debris or scum when collecting the sample. Ensure that the bucket is raised above the surface before it strikes the bank. Pour the collected sample into a collection pail. Repeat this procedure at four to six locations that are evenly spaced around the perimeter of the storage.
Thoroughly mix the composite sample collected. Follow Steps 4 to 6, reported earlier, on how to collect and package a sub-sample that is representative of the manure in the composite sample.
Large manure storages are difficult to fully mix, even with agitation. Samples from the top, middle and bottom of the storage can be collected separately and sub-sampled for analysis. Samples may need to be collected as the storage is being emptied in order to get representative samples.
Handling and Shipping Samples
Manure samples should be tightly sealed to prevent leakage and double bagged as an extra precaution. To ensure that samples sent for analysis are representative of the original manure nutrient content, proper precautions must be taken to avoid leakage, nutrient loss by volatilization, moisture loss and nutrient transformations. The following approaches are recommended:
- Liquid manure containers should be no more than three-quarters full to provide air space in the container for manure gases and to allow for expansion if the contents are frozen.
- Keep samples cool by refrigeration or by placing on ice until they are transported to the lab. Do not allow the samples to sit in a warm environment for longer than a few hours. Warm temperatures promote nutrient conversions that will change the nutrient content of the sample.
- Samples should be transported within a day. If this is not possible, they should be frozen until shipped.
- Samples should spend no more than two days in transit. Samples should be collected Monday to Wednesday so that shipping can be scheduled to ensure the samples are not held over weekends or holidays.
- Clearly label all samples with a permanent marker. The label should include owner’s or operation name, contact information, date of collection and type of manure.
Recommended Analyses for Manure Samples
Laboratories offer a variety of tests and analysis packages. The following is a list of recommended analyses for all manure samples:
- moisture content or dry matter content or total solids
- total nitrogen (Total Kjeldahl Nitrogen TKN)
- ammonium nitrogen (NH4-N)
- total phosphorus (P)
- total potassium (K)
Optional tests could include total nitrate-nitrogen(NO3-N), electrical conductivity (EC), pH, total carbon or carbon/nitrogen (C:N) ratio, chloride (Cl), sulphur (S), sodium (Na), calcium (Ca), magnesium (Mg) and micronutrients such as copper (Cu), manganese (Mn), zinc (Zn) and iron (Fe). It is usually not necessary to analyze manure for mineral constituents such as Ca, Mg, Zn and boron (B). Most manure contains significant quantities of these minerals, and fields with a history of manure application are rarely deficient.
Nutrient concentrations can be reported on an as is basis in kg/tonne, lb/ton, kg/m3, kg/1,000 litres, lb/1,000 gallons or parts per million (ppm).
Conversion Information for Manure Test Results
- P (total phosphorus) x 2.29 = P2O5 (phosphate)
- K (total potassium) x 1.2 = K2O (potash)
- per cent (%) x 20 = pounds per ton (solid manure)
- per cent (%) x 10 = kilograms per tonne (solid manure)
- per cent (%) x 10 = kilograms per 1,000 litres(liquid manure)
- per cent (%) x 100 = pounds per 1,000 gallons (CAN) (liquid manure)
- per cent (%) x 83 = pounds per 1,000 gallons (US) (liquid manure)
- mg/L (milligrams per litre) x 0.01 = pounds per 1,000 gallons (CAN) (liquid manure)
- mg/L (milligrams per litre) x 0.0083 = pounds per 1,000 gallons (US) (liquid manure)
- mg/L (milligrams per litre) x 0.001 = kilograms per 1,000 litres (liquid manure)
- mg/kg (milligrams per kilogram) x 0.002 = pound per ton (solid manure)
- mg/kg (milligrams per kilogram) x 0.001 = kilograms per tonne (solid manure)
- kilograms per 1,000 litres x 2 = pounds per tonne (solid manure)
- kilograms per tonne x 2 = pounds per ton (solid manure)
- pounds per ton x 5 = pounds per 1,000 gallons (CAN)
- pounds per ton x 4.17 = pounds per 1,000 gallons (US)
- 1 gallon (CAN) water = 10 pounds
- 1 gallon (US) water = 8.34 pounds
- tonne x 1,000 = kilograms
- mg/L (milligrams per litre) = parts per million (ppm)
- mg/kg (milligrams per kilogram) = parts per million (ppm)
Summary
Liquid manure is an excellent source of nutrients for annual and perennial crop production. To determine an appropriate manure application rate to meet crop requirements, optimize yields and minimize environmental effects, it is essential to know the nutrient content of the manure being applied.The best way to get an accurate, farm-specific estimate of manure nutrient content is through proper sampling and analysis. The accuracy and usefulness of a manure analysis is a direct reflection of the quality of the sample collected. The most convenient time to sample manure is when it is being pumped from the storage for application.
More importantly, a more accurate sample can be collected after the manure has been agitated and is being pumped from the structure.
Sampling from a liquid manure storage area is not as accurate as sampling during application, and it can be dangerous. Agitation causes the release of H2S gases. Respiratory equipment is recommended when working around the storage during or right after agitation.
It is best to consult with the manure testing lab before sampling to identify lab-specific requirements for sample size, packaging and shipping, turn-around times, analytical options and costs.
January 2008